Client Credentials Flow
Configure OAuth2 client credentials flow for microservices authentication and access token verification.
Overview
In the Client Credentials Flow the authentication sequence works in the following way:
Service A uses credentials to get an OAuth2 Access Token
Authorization Service(/authentication/unified-login/oauth2-basics#authorization-server) returns the OAuth2 Access Token
Service A uses the OAuth2 Access Token to communicate with Service B
Service B validates the OAuth2 Access Token
If the token is valid Service B returns the requested resource
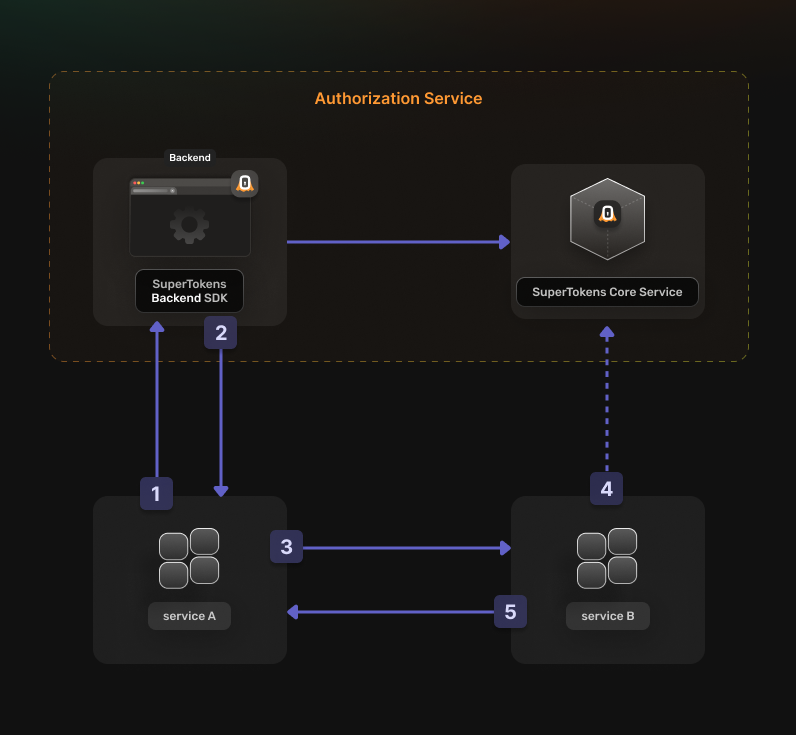
Before going into the actual instructions, start by imagining a real life example that you can reference along the way. This makes it easier to understand what is happening.
We are going to configure authentication for the following setup:
- A Calendar Service that exposes these actions:
event.view,event.create,event.updateandevent.delete - A File Service that exposes these actions:
file.view,file.create,file.updateandfile.delete - A Task Service that interacts with the Calendar Service and the File Service in the process of scheduling a task
The aim is to allow the Task Service to perform an authenticated action on the Calendar Service. Proceed to the actual steps.
Before you start
Steps
1. Enable the OAuth2 features from the Dashboard
You first have to enable M2M Authentication from the SuperTokens.com Dashboard. Select the relevant Managed deployment, open Features, and enable M2M Authentication. Changes are saved automatically.
You should be able to use the OAuth2 recipes in your applications.
2. Create the OAuth2 Clients
For each of your microservices you need to create a separate OAuth2 client.
This can occur by directly calling the SuperTokens Core API.
For manual curl testing, provision a config through your secret-management or deployment system, restrict it to the
service account with mode 0600, and do not commit it:
header = "api-key: <YOUR_API_KEY>"The cURL example refers to this file as <CORE_API_PROTECTED_CURL_CONFIG>. This keeps the API key out of shell history and
process arguments. Disable shell tracing and curl verbose or trace output, and ensure HTTP, process, and error logs do not
record request headers, config contents, or the API key.
See the Create OAuth2 client API reference for the complete request schema and response details.
curl -X POST "<CORE_API_ENDPOINT>/appid-public/recipe/oauth/clients" \
  --config '<CORE_API_PROTECTED_CURL_CONFIG>' \
  -H "Content-Type: application/json" \
  -d '{
  "clientId": "<STABLE_CLIENT_ID>",
  "clientName": "<YOUR_CLIENT_NAME>",
  "grantTypes": [
    "client_credentials"
  ],
  "scope": "<custom_scope_1> <custom_scope_2>",
  "audience": [
    "<AUDIENCE_NAME>"
  ]
}'
const response = await fetch("<CORE_API_ENDPOINT>/appid-public/recipe/oauth/clients", {
method: "POST",
headers: {
"api-key": "YOUR_API_KEY",
"Content-Type": "application/json"
},
body: JSON.stringify({
"clientId": "<STABLE_CLIENT_ID>",
"clientName": "<YOUR_CLIENT_NAME>",
"grantTypes": [
"client_credentials"
],
"scope": "<custom_scope_1> <custom_scope_2>",
"audience": [
"<AUDIENCE_NAME>"
]
})
});package main
import (
"net/http"
"strings"
)
func main() {
req, err := http.NewRequest("POST", "<CORE_API_ENDPOINT>/appid-public/recipe/oauth/clients", strings.NewReader(`{
"clientId": "<STABLE_CLIENT_ID>",
"clientName": "<YOUR_CLIENT_NAME>",
"grantTypes": [
"client_credentials"
],
"scope": "<custom_scope_1> <custom_scope_2>",
"audience": [
"<AUDIENCE_NAME>"
]
}`))
if err != nil {
panic(err)
}
req.Header.Set("api-key", "YOUR_API_KEY")
req.Header.Set("Content-Type", "application/json")
response, err := http.DefaultClient.Do(req)
if err != nil {
panic(err)
}
defer response.Body.Close()
}import requests
response = requests.post(
"<CORE_API_ENDPOINT>/appid-public/recipe/oauth/clients",
headers={
"api-key": "YOUR_API_KEY",
"Content-Type": "application/json"
},
json={
"clientId": "<STABLE_CLIENT_ID>",
"clientName": "<YOUR_CLIENT_NAME>",
"grantTypes": [
"client_credentials"
],
"scope": "<custom_scope_1> <custom_scope_2>",
"audience": [
"<AUDIENCE_NAME>"
]
},
)3. Set Up your Authorization Service
The Node.js and Python SDKs automatically initialize the OAuth2Provider recipe when it is absent. Add it explicitly to your Authorization Server configuration when you need recipe overrides or want to make the dependency visible.
import supertokens from "supertokens-node";
import OAuth2Provider from "supertokens-node/recipe/oauth2provider";

supertokens.init({
  supertokens: {
    connectionURI: "...",
    apiKey: "...",
  },
  appInfo: {
    appName: "...",
    apiDomain: "...",
    websiteDomain: "...",
  },
  recipeList: [OAuth2Provider.init()],
});
from supertokens_python import init, InputAppInfo, SupertokensConfig
from supertokens_python.recipe import oauth2provider
init(
app_info=InputAppInfo(
app_name="...",
api_domain="...",
website_domain="...",
),
framework="fastapi",
supertokens_config=SupertokensConfig(
connection_uri="...",
api_key="..."
),
recipe_list=[
oauth2provider.init()
],
)4. Generate access tokens
You can directly call the Authorization Server to generate Access Tokens.
See the Exchange OAuth grant API reference for response schemas and
error details. The cURL example remains authoritative for this request because the current FDI specification does not model
the form-encoded request body or HTTP Basic client authentication.
Keep the client secret out of command arguments and shell history. For manual testing, provision a curl config through
your secret-management or deployment system, restrict it to the service account with mode 0600, and do not commit it:
user = "<CLIENT_ID>:<CLIENT_SECRET>"Then reference the protected config by path:
curl -X POST '<YOUR_API_DOMAIN>/auth/oauth/token' \
  --config '<PROTECTED_CURL_CONFIG>' \
  -H 'Content-Type: application/x-www-form-urlencoded' \
  --data-urlencode 'grant_type=client_credentials' \
  --data-urlencode 'scope=<RESOURCE_SCOPE>' \
  --data-urlencode 'audience=<AUDIENCE>'
For production, load the secret from a secret manager in your application client. Disable shell tracing and ensure HTTP, process, and error logs do not record authorization headers, curl configuration contents, or client secrets.
You should limit the scopes that you are requesting to the ones necessary to perform the desired action.
The Authorization Server returns a response that looks like this:
{
  "access_token": "<TOKEN_VALUE>",
  "expires_in": 3600,
  "token_type": "bearer",
  "scope": "event.create"
}
Save the access_token in memory for use in the next step.
The expires_in field indicates how long the token is valid for.
Each service that you communicate with needs its own token.
With an OAuth2 Access Token, it can facilitate communication with the other services. Keep in mind to generate a new one when it expires.
5. Verify an OAuth2 Access Token
Use the released SuperTokens backend SDK validator instead of implementing JWT validation yourself. It validates the
signature, expiration, and stt=1 token type. Pass requirements for the intended audience, client, and every scope needed
by the operation. Also compare the token issuer with your Authorization Server’s issuer.
import OAuth2Provider from "supertokens-node/recipe/oauth2provider";

async function validateClientCredentialsToken(token: string): Promise<boolean> {
  try {
    const result = await OAuth2Provider.validateOAuth2AccessToken(token, {
      audience: "<AUDIENCE>",
      clientId: "<CLIENT_ID>",
      scopes: ["<YOUR_REQUIRED_SCOPE>"],
    });

    return result.payload.iss === "<YOUR_API_DOMAIN>/auth";
  } catch {
    return false;
  }
}
from supertokens_python.recipe.oauth2provider.interfaces import OAuth2TokenValidationRequirements
from supertokens_python.recipe.oauth2provider.syncio import validate_oauth2_access_token
def validate_client_credentials_token(token: str) -> bool:
try:
result = validate_oauth2_access_token(
token=token,
requirements=OAuth2TokenValidationRequirements(
audience="<AUDIENCE>",
client_id="<CLIENT_ID>",
scopes=["<YOUR_REQUIRED_SCOPE>"],
),
)
return result.payload.get("iss") == "<YOUR_API_DOMAIN>/auth"
except Exception:
return FalseHandle both SuperTokens session tokens and OAuth2 access tokens
If your Authorization Server is also a Resource Server, a protected route may accept either a SuperTokens session or an
OAuth2 access token. Parse the Authorization header strictly. Never accept a malformed bearer value, and never ignore a
validator’s failure or false result.
import express, { type NextFunction, type Request, type Response } from "express";
import OAuth2Provider from "supertokens-node/recipe/oauth2provider";
import Session from "supertokens-node/recipe/session";

async function verifySessionOrOAuthToken(req: Request, res: Response, next: NextFunction) {
  const authorization = req.headers.authorization;

  if (authorization !== undefined) {
    const separator = authorization.indexOf(" ");
    const scheme = authorization.slice(0, separator);
    const token = authorization.slice(separator + 1);
    if (separator < 1 || scheme.toLowerCase() !== "bearer" || !token) {
      return res.status(401).json({ message: "Unauthorized" });
    }

    try {
      const result = await OAuth2Provider.validateOAuth2AccessToken(token, {
        audience: "<AUDIENCE>",
        clientId: "<CLIENT_ID>",
        scopes: ["<REQUIRED_SCOPE>"],
      });
      if (result.payload.iss === "<YOUR_API_DOMAIN>/auth") {
        return next();
      }
    } catch {
      // The bearer token may be a SuperTokens session access token.
    }
  }

  try {
    await Session.getSession(req, res);
    return next();
  } catch {
    return res.status(401).json({ message: "Unauthorized" });
  }
}

const app = express();
app.get("/protected", verifySessionOrOAuthToken, async (_req, res) => {
  res.json({ message: "Authorized" });
});
from fastapi import HTTPException
from fastapi.requests import Request
from supertokens_python.recipe.oauth2provider.interfaces import OAuth2TokenValidationRequirements
from supertokens_python.recipe.oauth2provider.syncio import validate_oauth2_access_token
from supertokens_python.recipe.session.syncio import get_session
def verify_session_or_oauth_token(request: Request) -> bool:
authorization = request.headers.get("authorization")
if authorization is not None:
scheme, separator, token = authorization.partition(" ")
if scheme.lower() != "bearer" or not separator or not token:
raise HTTPException(status_code=401, detail="Unauthorized")
try:
result = validate_oauth2_access_token(
token=token,
requirements=OAuth2TokenValidationRequirements(
audience="<AUDIENCE>",
client_id="<CLIENT_ID>",
scopes=["<REQUIRED_SCOPE>"],
),
)
if result.payload.get("iss") == "<YOUR_API_DOMAIN>/auth":
return True
except Exception:
# The bearer token may be a SuperTokens session access token.
pass
try:
get_session(request)
return True
except Exception as error:
raise HTTPException(status_code=401, detail="Unauthorized") from error